Handover Tutorial
GUH OB’s/GYNAE ISBAR Handover App
ISBAR Handover tool allows you to…
- Review patients that are listed for handover, or add your own to be handed over
- Digitally Push Patients to a selected colleague, view the entire handover history for that patient
- Digitally Accept patients on behalf of your teams during your handover meetings
In a little more detail…
Reviewing Patients
Patients can be reviewed, updated, added and de-listed by authorized app users.
Reviewing and Updating Patients
After log in, you are presented with a listing of the patients currently listed for handover.
- A colour code is used here to present a patients NEWS or I-MEWS acuity: HIGH , MEDIUM or LOW maps to the respective colour codes for the patient acuity standard (NEWS, I-MEWS, PEWS) used.
- Click on a patient to see a synopsis of the patients details.
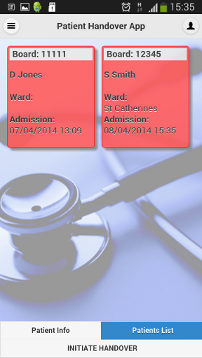
Patient listing screen-shot
Patient information is presented here using an ISBAR layout. The top level details are presented here. Each section of the ISBAR layout contains more fields where more details about the patient can be stored. Press the “more…” text or the pen icon (![]() ) to see more detail for the section you are interested in.
) to see more detail for the section you are interested in.
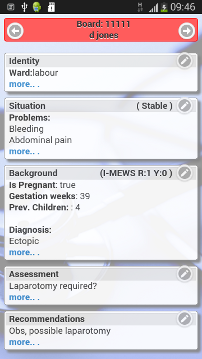

Patient synopsis and “Identity” subsection screen-shots
All ISBAR sub-sections contain a “current” and a “previous” tab. The “current” tab contains the most recently entered information about a patient. The “previous” tab contains all old and archived data. All old and “deleted” data is stored here for reference. As examples:
- The “previous” tab of the “Identity” section contains the history of all handovers for that patient attempted using the service.
- The “previous” tab of the “Assessment” contains all archived I-MEWS and NEWS entries for the patient
To edit a patients details under any ISBAR heading, press the edit icon (![]() ) on the relevant subsection tab. If relevant, you can also archive data points (the
) on the relevant subsection tab. If relevant, you can also archive data points (the ![]() icon) or add new data points (the
icon) or add new data points (the ![]() icon).
icon).
Adding Patients
Patients can be added using the side-menu on the Right hand side of the application. Just click the silhouette icon of the man in the top right hand side of the app to get the side-menu (the ![]() icon).
icon).
The quickest way to add a patient is to press “Scan Patient” from this menu, and scan the large barcode on the patients wrist tag. This will search to see if the patient is already listed, returning the patient if so. If the patient is not listed for handover, then a form will appear to add the patient. Alternatively, you can add the patient manually using the “Add Patient” option in the side-menu. If scanned, most of the values in the “Add Patient” form will be pre-filled. You will need to add the following:
- The current Team Lead for your ward
- If the patient is pregnant or not
- If the patient is stable or not
- A NEWS / I-MEWS acuity rating for the patient.
…and the following optional fields
- The doctor the patient was booked under
- One or more reasons for listing the patient – added using the “Add Problems” button
- If you have specific that the patient is pregnant:
- The number of previous children and the current gestation time in weeks
- You will have to enter an I-MEWS rating rather than a NEWS one.
Once you have saved a patients details in the system you and other users can also optionally add other details under their listing.
Please note that this first version of the Handover tool does not support scanning on all mobile devices. Scanning on Android phones is supported, with scanning on iOS to be added in the next few weeks.Also, the web version of the handover tool does not support scanning. In cases where scanning is not supported however, the “Scan Patients” function can still be used to search for patients using their Hospital Board Number.
De-listing Patients
Patients are added for Handover using the process described above. Should a qualified member of the medical team deem the the patient does not require to be handed over, they can choose to “De-List” that patient. There is a option to add some text here to explain the reason for the de-listing. This text is optional.
“De-listing” means that the patient will no longer be listed in the Patient listing, and that no alerts will be raised when the patient is not Handed over.
To “re-list” a previously “de-listed” patient, the user can:
- Scan their barcode using the scanner function
- Enter their board number using the scanner function
- Add them again using the “Add Patient” function
Any information about the patients previous handover listing will be available (in the ISBAR sub-section “previous” tabs) for review alongside their new listing information.
Handover
In the Handover service, a patient nominally “belongs to” a Consultant who is on shift. This is separate to the Consultant that a patient may have been “booked under” – the Consultant who booked the patient from their clinic.
Using the Handover service, authorized team members perform their patient actions on behalf of the Consultant that the patient “belongs” to. To handover a patient, the user must first “push” the patient to another Consultant. An agent for this other consultant must then “Accept” the patient. Until the patient is accepted in this manner, they are still registered in the system as belonging to the “pushing” Consultant.
Handover: “Pushing” patients to another team
To “Push” a patient, choose the “Initiate Handover” button on the bottom of the screen on the main page of the application. Choose the patients you are going to handover and press “confirm”. A dialogue will appear from where you can choose the consultant you wish to “push” the patient to. Press “Confirm” con confirm the push. You can cancel the pushing of a patient by clicking on the cancel icon (![]() ) and confirming the cancel.
) and confirming the cancel.
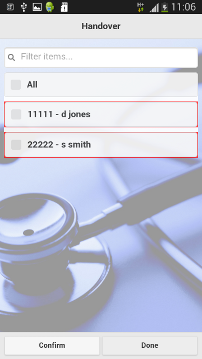
Handover screen-shot
Handover: “Accepting” patients on behalf of your team
To view the list of patients who are currently being handed over, open the side-menu on the Right hand side of the application and choose “PENDING HANDOVER”. Just click the silhouette icon of the man in the top right hand side of the app to get the side-menu (the ![]() icon), and then click on the button with “PENDING HANDOVER” written on it.
icon), and then click on the button with “PENDING HANDOVER” written on it.
This screen shows the patients pushed for handover, and the Consultant that they have been “pushed” to. The user can use this screen to “accept” or “reject” patients for handover. As mentioned, patients are “accepted” on behalf of a Consultant.
Notes
This service is currently in use in a major hospital group. It is under active development, with new features being added. We are very interested in your feedback! Please Email us at handover@ranesys.com if you have any suggestions for its improvement.
